Fuel Included isn’t just about electric cars, but about the transition to a low carbon lifestyle. One of the easiest ways to reduce your carbon footprint is to use less energy, and that can be as simple as wasting less energy around the home. A beneficial side effect is that you save money too.
A useful technique to investigate where heat is lost from your home is to use an infrared camera to show up areas that are cold and which typically indicate gaps around windows or doors, but which are not as obvious as draughts. The approach is known as Thermography but one of the most important early uses of infrared cameras was mounted on the nose of an aircraft for target location, so-called Forward Looking Infrared (FLIR) cameras. For this reason, and because the leading manufacturer of such cameras is known as FLIR Systems, the term FLIR is often used as a generic term for thermographic cameras.

FLIR cameras have historically been very expensive to buy (though they are now coming down in price to typically about £1000) so there is a healthy rental market for them. Recently a group of colleagues at work clubbed together to hire one for a week and so I got a chance to try one out for a weekend for about £30.

The camera arrives in a big industrial box (see Figure 1) but it is actually quite small, about the size and shape of a radar gun (see Figure 2). It works much like a modern digital camera, with images recorded on internal memory that can be downloaded via a USB lead to a PC. A neat feature is that every image is recorded twice, as a conventional colour image and as an IR image.

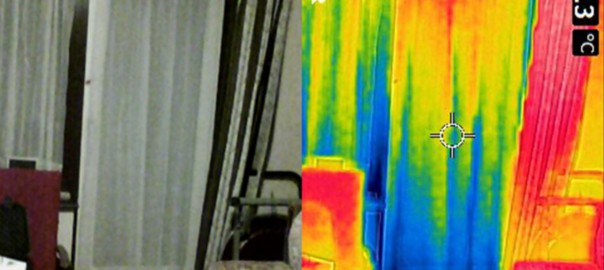
I used the IR camera to do an ‘audit’ of the house, at night and in cold weather for maximum contrast. I imaged all the walls and doors, inside and out. I also checked each of the radiators to make sure they were working correctly. The IR images are coloured to show different relative temperature, from black (the coldest part of the image) through blue, green, yellow, orange, and red then to white (the hottest part of the image). So a gap around a door will show, say, dark blue while the rest of the door and frame are yellow and red. Similarly a cold spot in a radiator will show, say, green amongst mostly red.

The images clearly showed up problems with our two back doors. The patio door had a very clear dark blue patch along the bottom (see Figure 3); we were already aware of a draught from this area. The main back door had a dark blue patch along the lock side, and another around the cat flap (see Figure 4). These are issues that I have noted to return to on another day to see if I can fix them with some draught proofing.
The FLIR camera was easy to use and I recommend it to anyone who wants to know more about where their home is leaking energy.
[Part 2 is here]

2 thoughts on “Using an Infrared Camera to Look for Wasted Energy”